Ubert
Serverless meets Ridesharing: The development of Ubert – A stateless Uber Clone built with AWS and React
Lucca Bauer, Matthis Bauer, Jonas Fischer, Hannah Holzheu, Lukas Karsch
25-08-17
Introduction
In the tech world, one of the best ways to learn a new skill or get an overview of technology you never worked with is by jumping into the deep end and just trying to build a project with it. That’s exactly what we did with Ubert.
Our aim wasn’t to build a perfect state-of-the-art ride-sharing application but to gain hands-on experience with cloud computing, particularly using Amazon Web Services (AWS).
The result is a basic Uber clone that handles core functionalities, providing us with a solid understanding of cloud tech.
What is Ubert?
Ubert is our attempt at implementing a ride-sharing application like Uber using AWS services. To keep things simple we focused on the core features. Just like its real-world counterpart, Ubert allows users to set a start and destination point and request a ride from nearby drivers. The app features real-time updates of driver locations on a global map, making it easy for users to see available drivers and track their rides.
When a ride request is made, the system calculates which driver has the shortest route to the customer’s pickup location and assigns the ride to that driver. This driver then navigates to the customer and takes them to their destination. Although we currently use simulated drivers to demonstrate how the system works, our design provides a solid groundwork for integrating real drivers in the future.
Motivation for building an Uber clone
The first struggle we faced was finding a project that on the one hand we were interested in and on the other hand, the effort was within the realm of feasibility.
At first, we had the idea of building a ticketing application for businesses where workers could enter their working times within a web interface. We eventually threw that idea overboard because in the past we already built plenty of basic REST applications and we figured that this wouldn’t be much different when working with cloud.
After struggling to find the right project idea, inspiration finally hit us when we looked at one of the biggest cloud success stories out there—Uber. Uber is not just a ride-sharing giant; it’s also renowned for its innovative use of cloud technologies. They leverage the cloud to handle immense amounts of real-time data, scale their operations globally, and ensure that their services are always available, no matter where you are.
In the end, we decided to build an Uber clone because it involves real-time data sharing, an area where we had limited experience, alongside basic REST features that we already knew how to implement. In combination with bringing the entire application to the cloud we figured that this would be the right balance between learning new things and still having enough time developing an actual application.
Another good aspect of building a clone for us was that we didn’t have to think about how our main features should actually work because you can just copy the functionality and only have to worry about how you can realize it technologically.
Ubert Features
User Panel
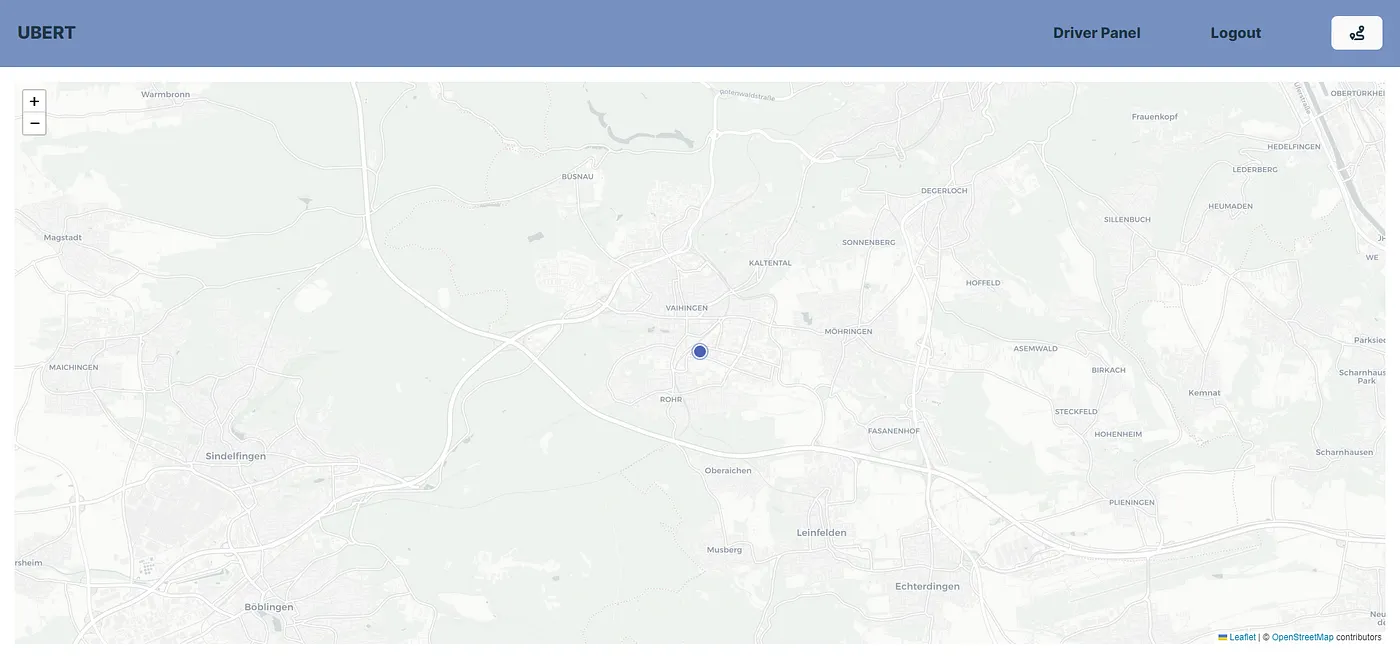
Upon logging in, users are directed to the homepage, where they can dynamically interact with a map displaying their current location.
By tapping the routing icon in the top bar, a new window opens where users can select their trip’s starting point and destination. If users wish to be picked up at their current location, they can quickly choose this option with a single button.
To enhance user experience, we’ve implemented auto-completion and suggestions for location entries, making the process quicker and more intuitive.
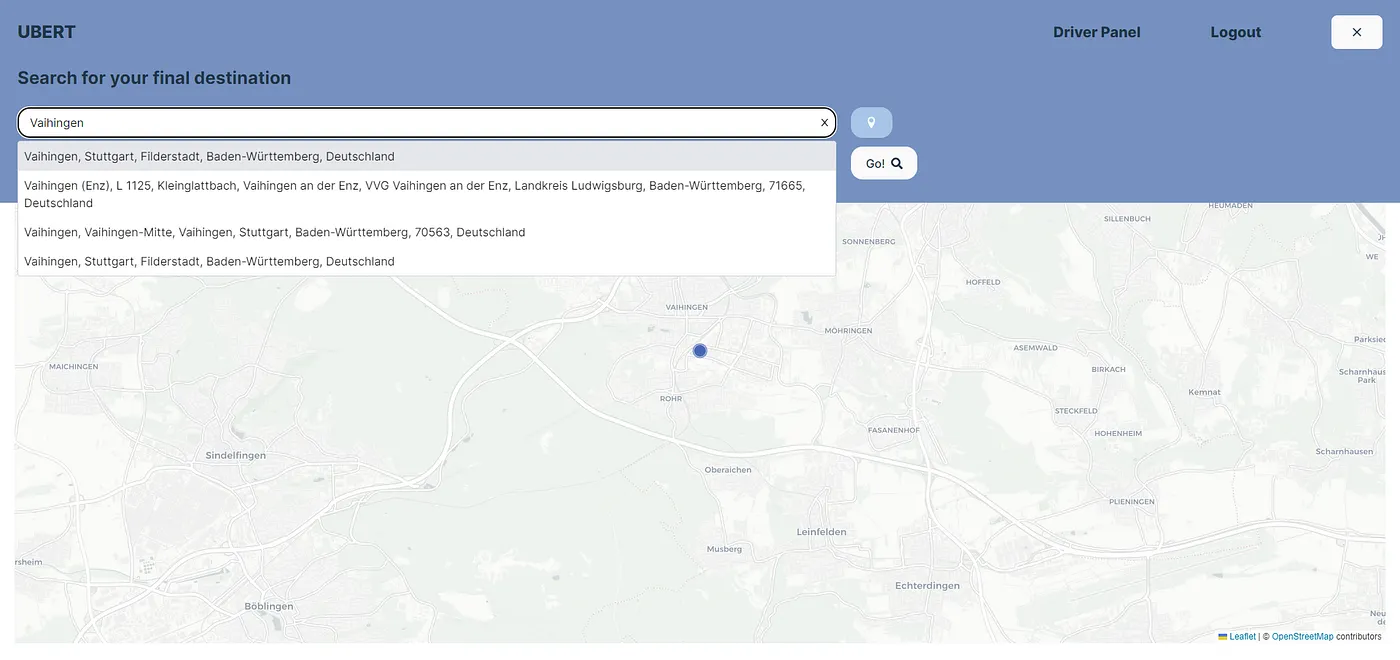
Markers for the start and destination are displayed dynamically on the map after the user has completed entering the location.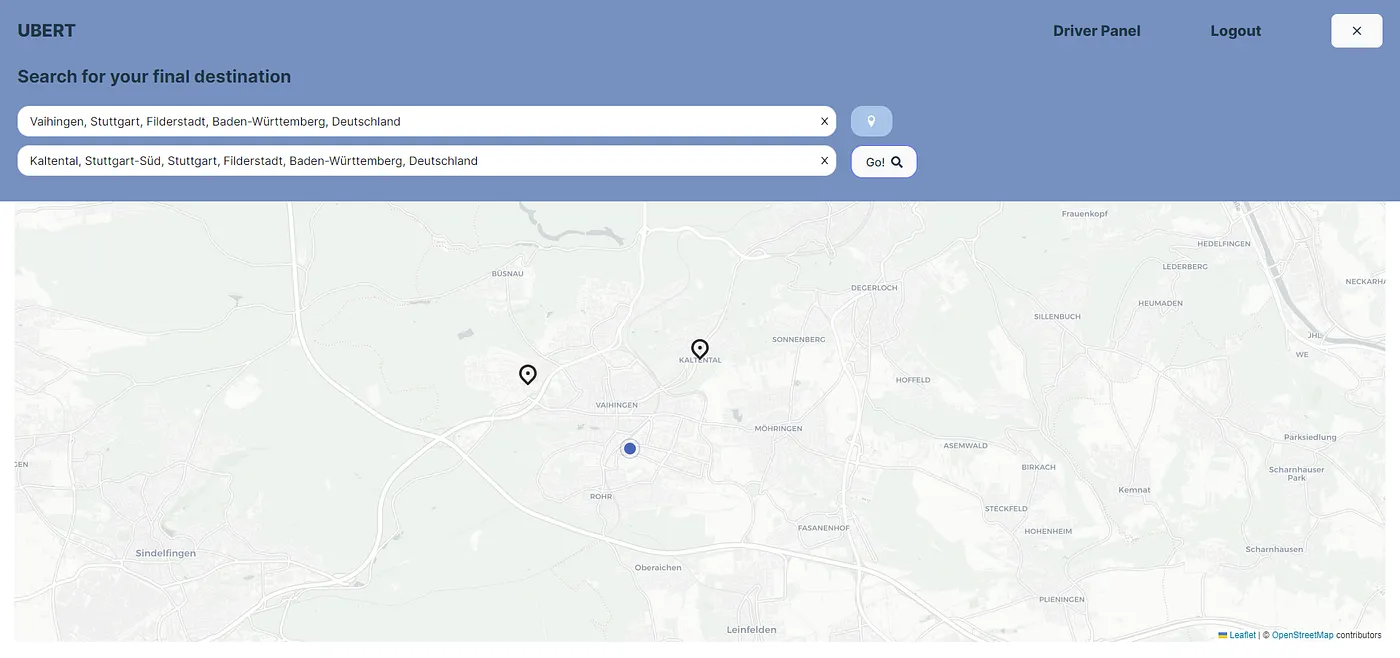
Once the start and destination points are selected and the user taps “Go,” the system calculates the nearest available driver who can reach the customer’s starting point most quickly. The driver’s route is then entirely updated to provide the most direct and efficient path to the customer. Once the driver begins heading towards the customer, the vehicle is marked as occupied for other customers and is no longer available for new ride requests.
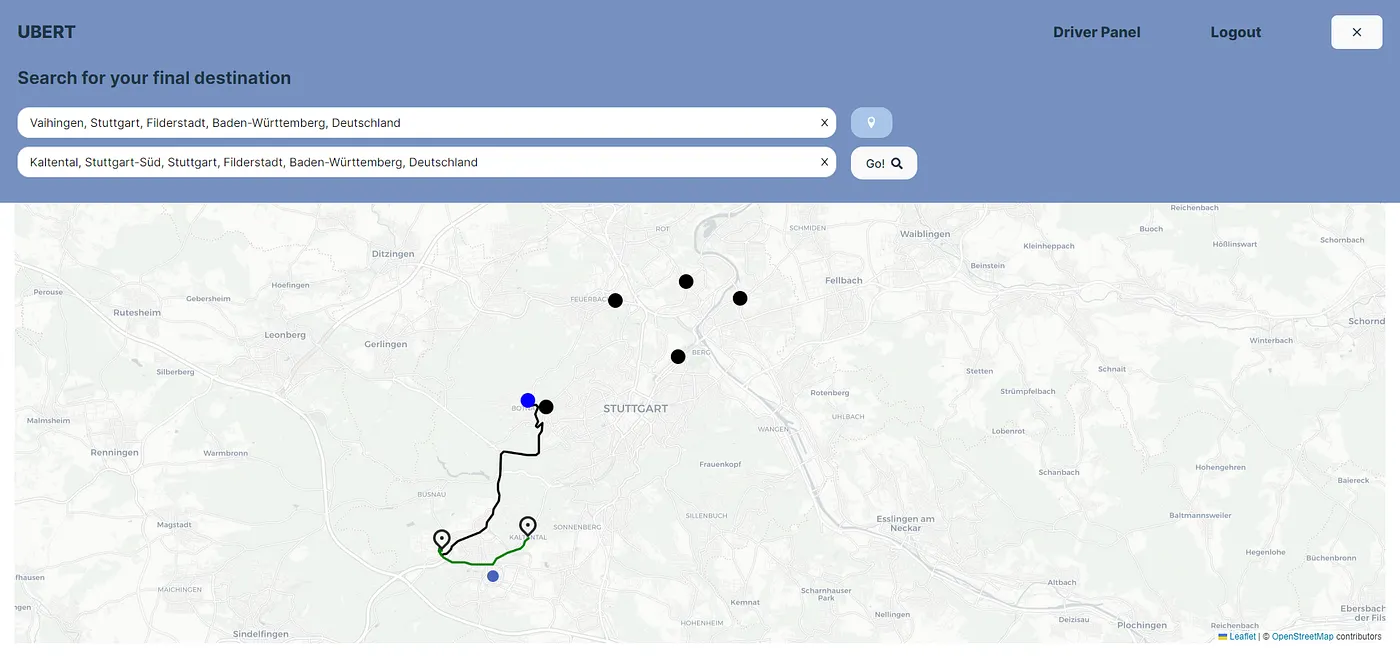
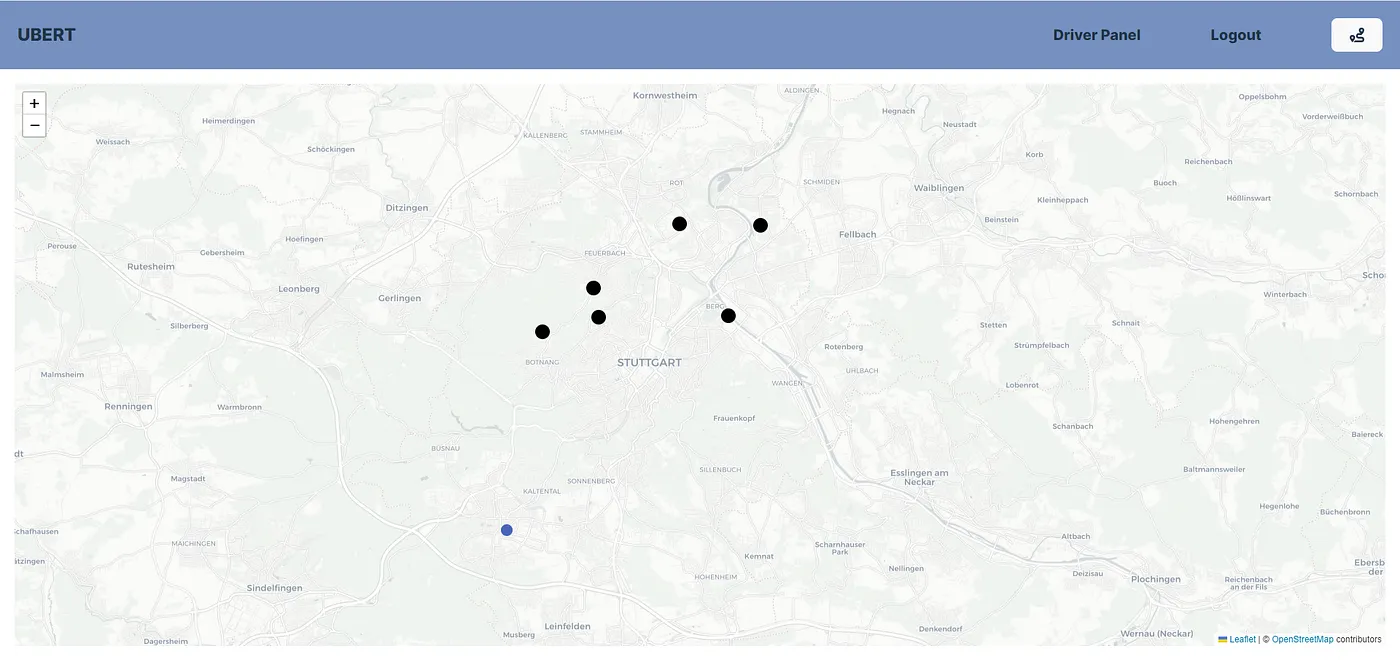
All simulated drivers are displayed on the map of the customer’s homepage as black dots, with their positions updated in real time. Occupied drivers are marked with red dots. This feature provides customers with a clear, real-time overview of all available and busy drivers in their area.
Driver Panel
Via the topbar users can access the driver panel where they can act as drivers. This was implemented in that way to simplify showcasing and testing the application. In further development we would have changed that users can either sign up as regular users or as drivers or at least have a more complicated switch from user to driver.
Users can click “Start Car” to simulate a moving driver who randomly navigates through Stuttgart. A random route is calculated within the city, and the simulated driver follows this route continuously. This feature enables the simulation of multiple drivers across various clients, similar to how Uber manages its drivers, providing a realistic and comprehensive demonstration of the app’s capabilities.

When a driver is assigned a route to a user who has requested a trip, their current random route on the Driver Panel is immediately interrupted. The app calculates the fastest route to the customer and from the customer’s start point to their destination. The simulation then switches to show the driver heading directly to the customer’s location. Once the customer is picked up, the driver’s route continues along this optimized path to the customer’s destination, providing a realistic simulation of a trip.
On the Driver Panel, a user icon appears at the customer’s pickup location, indicating where the driver is heading to collect the customer. As the driver makes their way to the customer, the point turns red, until the driver and customer reach the customer’s final destination.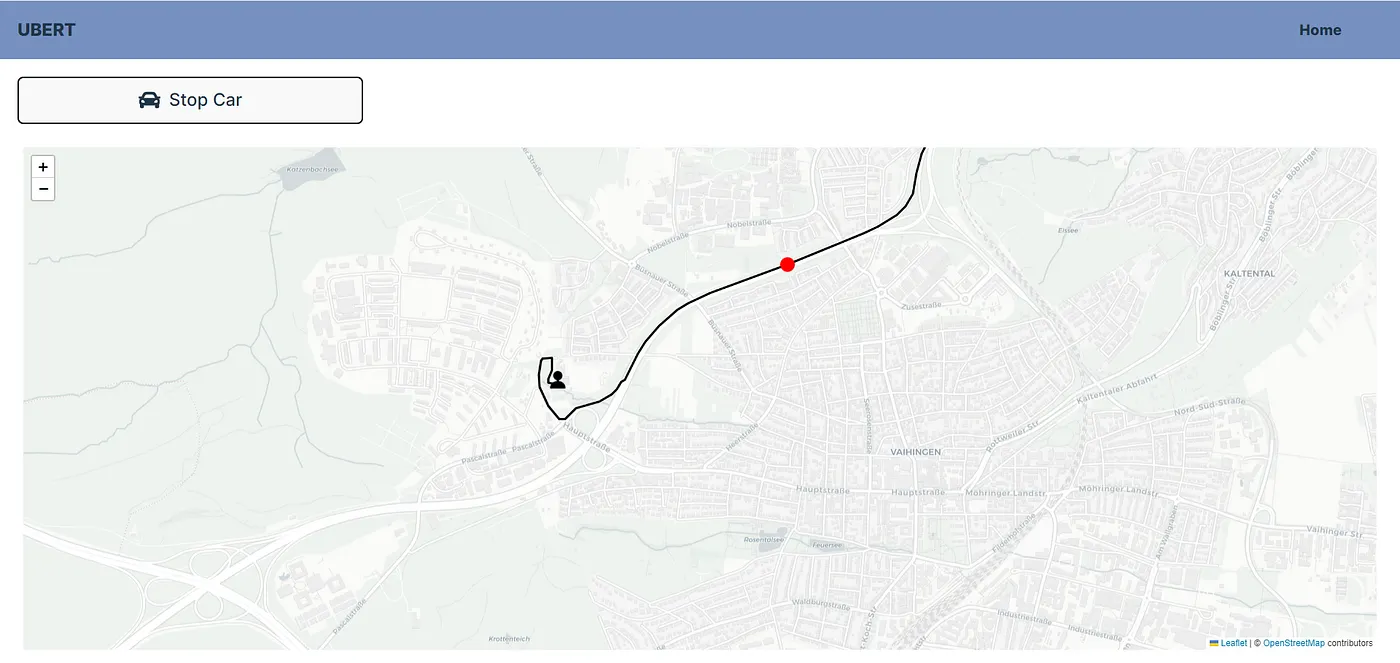
Repository Structure Overview
Turborepo
To handle all of the code that was going to be necessary, we set up the project as a monorepo which we managed using Turborepo. It leverages npm workspaces and speeds up development by allowing parallel task execution like test, build etc. In a simple turbo.json file at the root of the repository, tasks and their dependencies can be defined.
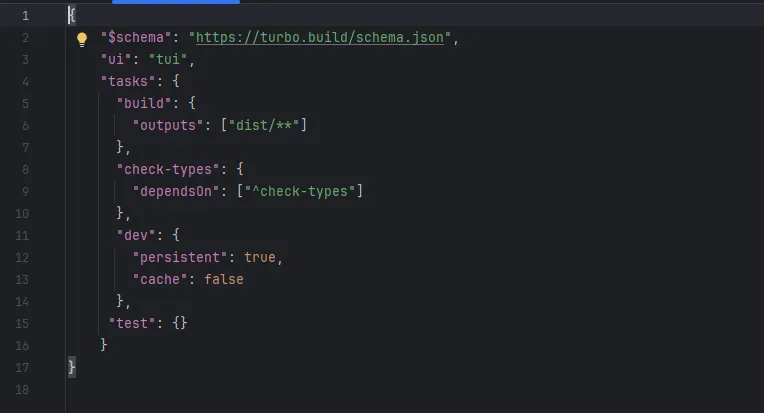
turbo.json
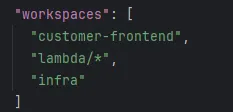
workspaces inside of package.json
Turbo then uses these dependencies to build a dependency graph and executes all tasks in the correct order and in parallel.
Turbo also offers a great user interface inside of the CLI that is especially helpful when keeping track of several tasks that are running in parallel.
This monorepo is a great setup, because it allows us to colocate all the code. It also makes code sharing easy, as local packages inside of our workspaces can be easily installed into other packages. If we had several frontends (which we briefly considered to split admin, driver and user interfaces into different apps), we could easily share UI components by creating a @ubert/ui package and installing it into each of the apps.
Architecture
With our experiences from previous projects the first architecture that comes to mind is a standard application with a backend running on a server. For the cloud computing course this would mean a hosted virtual machine handling the real time location updates and the trip requests. The other option, and the one we ended up using, was to store the live data in a database and update it using serverless functions.
The first option would not only limit the learning experience regarding cloud computing because most of the work would be spent setting up the backend server and therefore fail the goal of this course. But there were also several other aspects we had to consider.
Cloud Provider
Before we could start with planning our architectural decisions, there was one major question left to be answered: Which cloud provider should we use? Since some of us already had some experience with AWS and since it is the most used cloud provider, we did not spend too much time evaluating this decision and just went for AWS. However, when developing a real application one should make further considerations about aspects like vendor lock, pricing and experience in the team.
Cost
The second thing we thought about was cost. While you only have to pay for your actual usage with lambda, an EC2 instance has to be paid 24/7. For trip requests there is no doubt that lambda is the perfect choice. This question is more difficult when looking at live data. We were discussing a lot about whether there is a breakpoint on which EC2 would pass lambda in cost efficiency. This is not an easy question to answer because it relies on multiple factors. How often do drivers send their location to the backend? When using EC2, does the data get stored in a database anyways to ensure data transparency? When handling so many requests that several lambda functions are used non-stop, are they still more cost efficient than an EC2 instance used at full capacity?
After we did some research and made a rough calculation, we could not make a choice about which implementation would be more cost efficient but the important learning was that there are many factors to take into consideration and the right solution is different for every project.
Maintainability
Another aspect is maintainability. This is a clear advantage of using lambda functions because it can not be underestimated how much effort it takes to maintain EC2 instances, even more so when you talk about scaling.
Scalability
The fourth aspect we looked at is scaling. Both versions have the option to implement automated scaling but with lambda functions this is all handled by AWS and does only require a scaling limit. Alternatively you could use services like ECS / EKS / AWS Fargate to scale your application automatically but after briefly looking into these options we decided that the other aspects all point towards serverless functions and it was not worth the deepdive that is required to make use of these services.
Performance
And last but not least we had to take performance into consideration. The way lambda functions work and the reason why they are so cost efficient is that they only use compute power when needed. When a lambda function does not get called for a while the compute power is deallocated and can be used by other functions. As a result it takes quite some time to start an instance on the first call in a while. Especially for real time data this can become a big problem and has to be considered before deciding to use lambda functions.
This is no problem for trip requests but it can be challenging for updating and retrieving data in the database. Our biggest concern was that the update frequency was faster than the time the lambda function needed to update the database and thus would result in inconsistency. But our testing with a maximum of 10 drivers at the same time with an update rate of 500ms had not shown any signs of this being true.
As with the other aspects on a larger scale this has to be kept in mind. AWS DynamoDB is supposed to be able to read and write 40,000 items per second which indicates that it is suitable even for large scale applications.
In conclusion, our main goal was to learn as much as possible about how to implement a fully cloud based architecture, especially with a different approach than the classic frontend-backend architecture.
Architecture Overview
Ubert is a cloud-centric application developed and hosted using AWS services, ensuring scalability, reliability, and ease of maintenance.
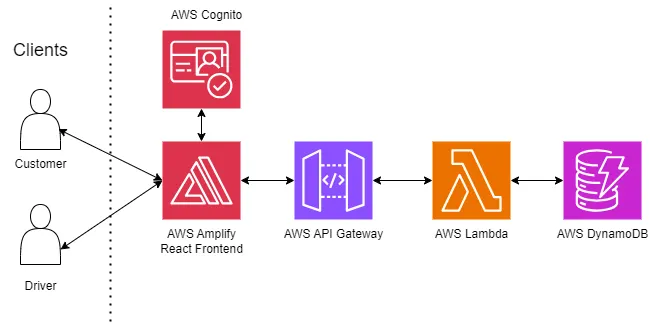
The frontend of Ubert is built with React and hosted using AWS Amplify, which seamlessly integrates with other AWS services.
User authentication and management are handled by AWS Cognito, which securely manages the sign-up- / sign-in-process, and access control for users.
User requests from the React web app are routed through an API Gateway, which then directs them to the appropriate Lambda function for processing, where the business logic is executed.
To maintain persistence, especially for live location data, the corresponding Lambda functions store this data in AWS DynamoDB.
Architectural Components
So now that you have a basic idea of what our architecture looks like at the top level, let’s take it a step further and dive deeper into the functionality of the different components and how we implemented them.
Frontend
Frameworks and Libraries
For the frontend of our application, we chose to use React. Given that our team already had experience with React, this allowed us to focus on the app’s core functionality rather than learning a new framework.
For mapping, we chose Leaflet, an open-source library for interactive maps. Leaflet, combined with OpenStreetMap, was a perfect fit for our student project due to its availability at no cost. In addition to map visualization, we also utilized OpenStreetMap for route calculation (driver simulation) and location suggestions (for the start and destination input fields).
Technical Overview: Driver Simulation
In our frontend, driver simulation is managed through the Driver Panel, where we mimic driver behavior. This simulation runs entirely within the frontend, with simulated drivers using WebSockets to send their live positions to the cloud. This approach not only reflects how real drivers (clients) would communicate their locations but also sets the stage for a seamless transition to actual drivers in the future.
Currently, the simulation operates exclusively within Stuttgart. We generate two random latitude and longitude coordinates within the city. These coordinates are used to request route information from the OpenStreetMap routing API. The API returns a polyline, which is an array of geographic coordinates outlining the route.
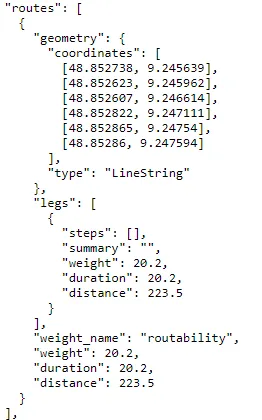
Figure 2: Part of JSON response from OSRM routing API showing the coordinates field, which defines the polyline of the route.
To simulate the car’s movement the car’s position is updated along the route using the polyline coordinates. At regular intervals, the car moves to the next coordinate in the polyline. As the simulated driver reaches the endpoint of the route, the destination is set as the new starting point and the process repeats, providing a dynamic simulation of driver movements within Stuttgart.
While effective for demonstration purposes, the current simulation does not mimic real-world behavior perfectly. Due to the nature of the polyline data from the OpenStreetMap routing API, the distances between coordinates can vary greatly. As a result, the car’s movement can appear less smooth.
Backend and Cloud Services
Amplify
AWS Amplify is a development platform that simplifies the creation of full-stack applications by integrating AWS services like hosting, storage, authentication, and APIs with minimal code. It enables quick setup of fully managed CI/CD pipelines for automated builds, testing, and deployment. Amplify also offers a powerful CLI to easily manage backend services, such as databases and serverless functions, directly from the command line.
Initially, we considered using Vercel for our project, as we have some experience with it, especially in combination with React. However, because our application is built within the AWS ecosystem, we decided to give Amplify a try.
Both choices offer a quick and easy setup with an automated pipeline running on every commit. For our use case, we could not find a big difference regarding ease of use and the time required to set up a project. Another similar point is the costs to maintain each service. Both Amplify and Vercel are a good choice for small scale products or prototypes, but lose their cost efficiency on a larger scale. The main difference we did find is, of course, the integration of AWS services.
While we were working on some sample projects to get used to Amplify, we were surprised how easy it is to integrate different services just by using the command line. You need authentication? Just one command. Add a Lambda or a database? Another command. So with just a few commands and some frontend code, one can build an application with authentication, a lambda based backend, and an automated pipeline.
Cognito
AWS Cognito is a user management service that lets you create user pools to manage your application’s users and user groups with assigned permissions. It offers a hosted UI for login and registration, requiring only a callback link for sign-in redirection and a logout link to sign users out. Cognito also simplifies adding Multi-Factor Authentication (MFA) with options like email or SMS verification. AWS also offers custom styling for the hosted UI which makes it possible to have a sign up/in process that matches the rest of the applications appearance.
Through past projects we had experience developing user management ourselves which is a lot of work. Therefore we were happily surprised how fast we got user management up and running and could focus on the actual use case of our application.
Because most applications require almost the same features of user management it can be perfectly outsourced to other services.
API Gateway
To manage all incoming requests at one place we decided to use an API Gateway, which takes the request and forwards it to the correct backend service depending on the requests format.
We decided to go for the AWS API Gateway because it integrates very well with our other AWS Services. With this AWS Gateway you have the options to create both automatically scalable REST as well as websockets endpoints.
When it comes to the REST endpoints you’re able to define an endpoint by just choosing a resource path and then defining the HTTP method the endpoint should listen to on that route. Because it is an AWS service it perfectly integrates with other AWS services and you can just select a service that should be called once the endpoint is reached. For us this made it extremely easy to connect our AWS Lambda functions to our API Gateway.
Setting up a websocket endpoint using this AWS service is just as easy and also comes with handy features added on top of the websocket protocol. You define the name for your websocket and then choose a route selection expression which is a parameter that is read out of every message and used to assign each message to the matching route. This makes it super simple to keep the message stream in the websocket organized and trigger multiple separate actions through the same websocket channel.
For our application we used both REST and Websocket endpoints. The REST endpoint listens on POST requests from users asking for a trip. It then triggers the lambda functions which are responsible for finding the best matching driver.
The websocket connections are used for keeping track of all the drivers locations and broadcasting it to all connected users. And also for sending information to the user that his trip was accepted and to his driver what route he has to take now.
The AWS websocket also has the option of a $connect and $disconnect route which gets triggered - as the name suggests - on connect or disconnect. This came in handy for us because that way we can store all the currently connected users in a database. These stored connections made it possible for us to implement a websocket broadcast because this isn’t a natively supported feature of the websocket protocol.
The main advantage of this AWS service is that it is super simple to set up and get all the components of the application connected. Also there is basically no maintenance to it because AWS handles scaling by itself.
The disadvantage is that you are limited by the features that AWS offers and if the application needs more specific requirements you could be better off with a self hosted solution.
Also a thing to consider is that you not only pay for the amount of requests but also for the data that gets transferred. So it could also make sense to use the AWS Gateway for requests which contain less data transfer and handle the ones with large amounts of data in a separate hosted solution.
Lambda Functions
As we already mentioned before, we used lambda functions to handle backend requests. Our application consists of two main features, one handling the trip requests, the other one updating the drivers locations. Each feature consists of multiple lambda functions. We decided to use a modular concept by splitting up big functions into smaller ones each serving only one purpose. This increases both maintainability and readability. On the other hand, this comes at the cost of performance due to the nature of lambda functions. In our opinion the advantages outweigh the disadvantages of modularization.
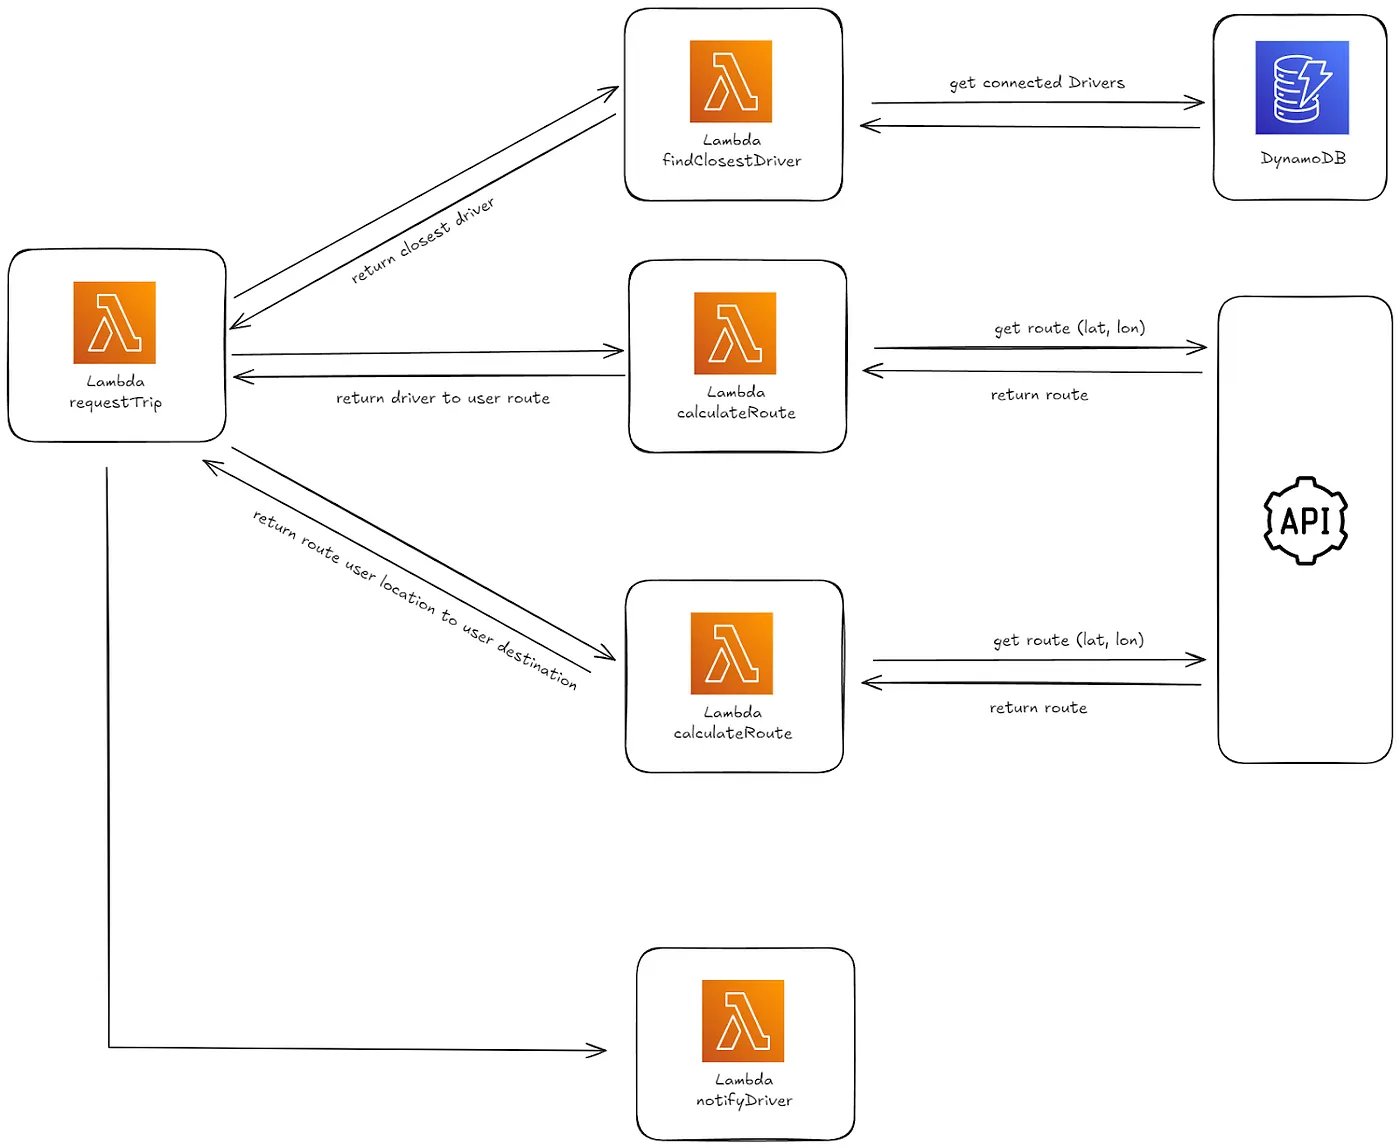
Figure 3: Request trip lambda invocation flow
Upon a trip request, the API gateway forwards the request to the corresponding lambda function. The requestTrip Lambda function manages the process by interacting with other Lambda functions: findClosestDriver retrieves available drivers from DynamoDB, and calculateRoute computes the route between the user and the driver, as well as the destination. The final function, notifyDriver, sends the trip details to the selected driver.
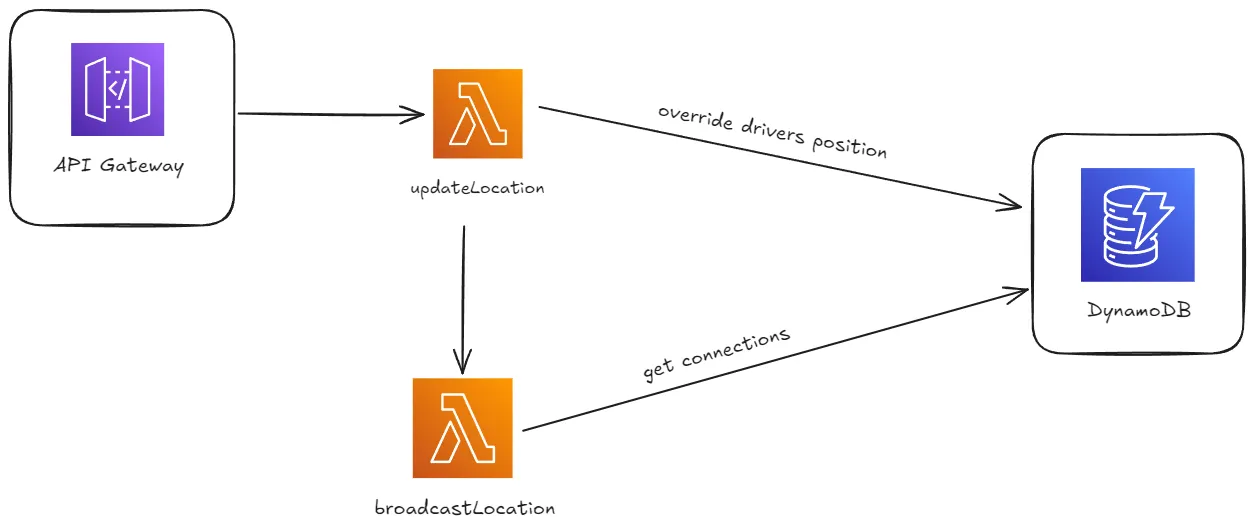
Figure 4: Update location lambda invocation flow
The request is routed through the API Gateway triggering the updateLocation Lambda function, which updates the driver’s position in DynamoDB. Then the broadcastLocation Lambda function is called which then retrieves connected users from DynamoDB and broadcasts the updated location to them, ensuring all users have real-time visibility of the driver’s movement. This setup enables efficient location tracking and data distribution using serverless architecture.
Apart from these custom lambda functions there are two more that are triggered by the web sockets default routes $connect and $disconnect. The connect lambda function writes the user’s connectionId and userType to the DB, ensuring all active connections are stored. The disconnect lambda function deletes the corresponding entity so that there is no inactive user stored in the DB.
DynamoDB
AWS DynamoDB is a fully cloud hosted NoSQL database. Its data model is schema-less which means that it allows flexible data structures where an item can have varying attributes. This was extremely helpful during development because in the beginning we had to change our data objects a lot and with the perks of DynamoDB we did not have to set up a completely new table every time. However, the disadvantage of this schema-less data model is that you have to be extra careful with the specification of your attributes because a simple typo will create a whole new column in your table.
In our Uber clone, we use DynamoDB to store driver location data every 1000ms, which is pushed by a Lambda function. DynamoDB is particularly well-suited for this use case because it efficiently handles high-frequency writes and scales automatically with the incoming data. As DynamoDB was designed for low-latency, high-throughput performance, it guarantees that driver location data is promptly accessible for processing, enabling smooth and efficient tracking.
While S3 could technically store location data as objects, it’s not designed for real-time querying or handling rapid, frequent updates, which are essential for tracking drivers in real time. On the other hand, MariaDB, being a relational database, requires a fixed schema making AWS DynamoDB the optimal choice for this project.
Data Flow
To illustrate the interaction between the components of our application, in the following there are three data flow diagrams of our applications main functionalities.
User Login
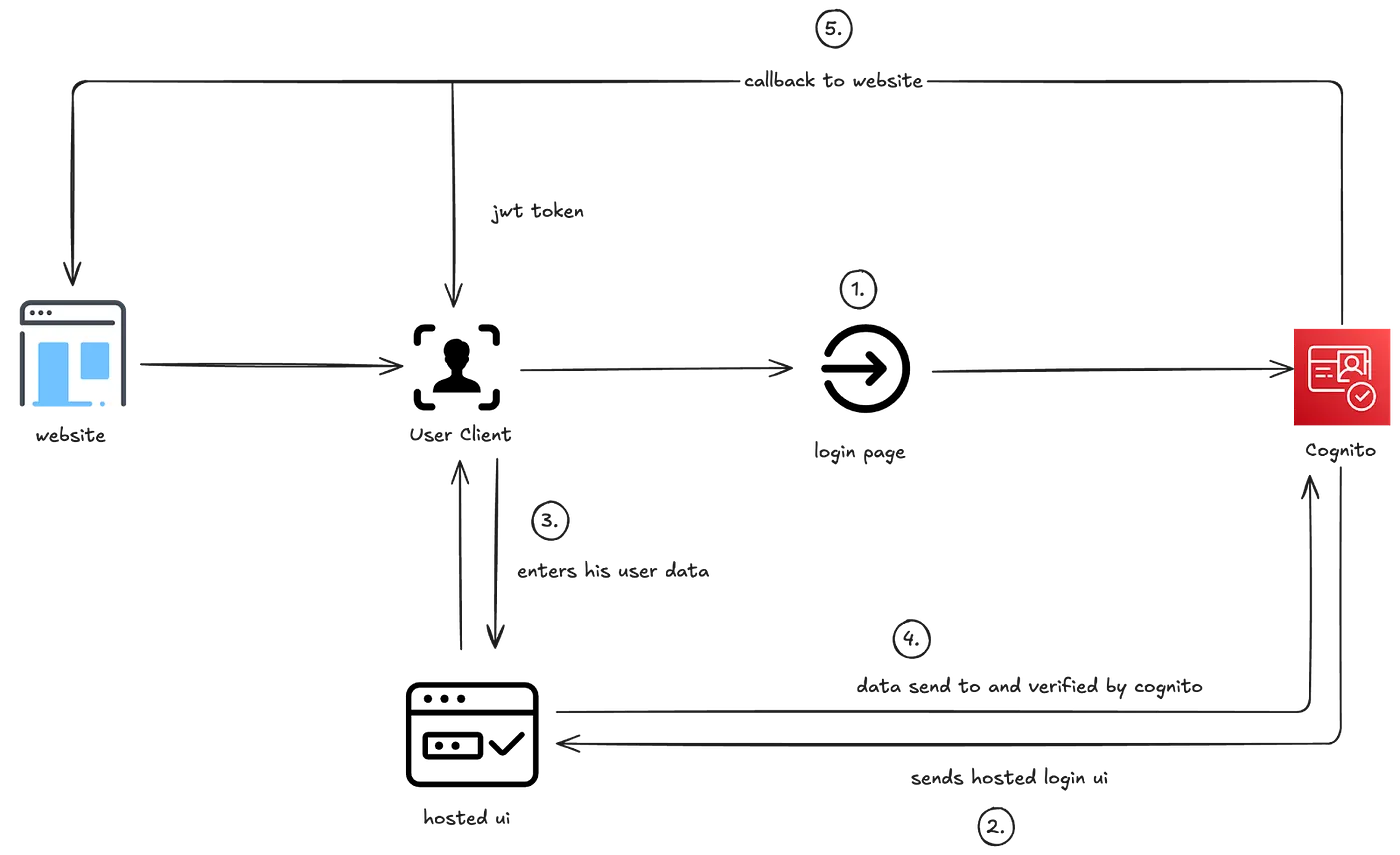
This diagram illustrates an authentication flow using AWS Cognito. The process begins with a user accessing a website, which redirects them to a login page hosted by Cognito. The user enters their credentials on the hosted UI, and the data is sent to Cognito for verification. Once verified, Cognito generates a JWT token and redirects the user back to the website, allowing authenticated access.
Location Update
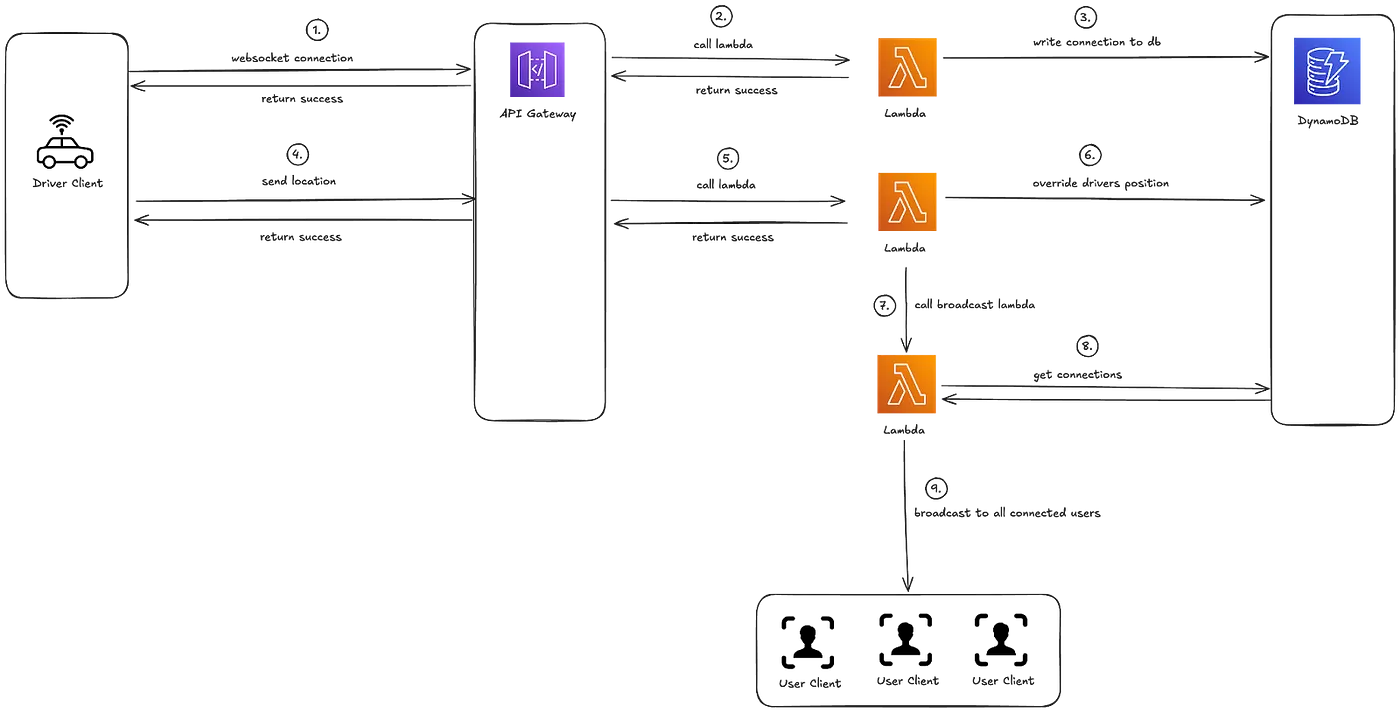
This architecture diagram represents a serverless WebSocket API using AWS services. The process begins with a driver client establishing a WebSocket connection through the API Gateway, which triggers a Lambda function to store the connection details in DynamoDB. When the driver sends location data, it is processed by another Lambda, which updates the driver’s position in DynamoDB. A subsequent Lambda function retrieves all connected users and broadcasts the updated location data to them.
Trip Request

This diagram shows a serverless workflow for handling trip requests. A user client sends a trip request via the API Gateway, which triggers a Lambda function to find a nearby driver which is stored in a DynamoDB. Once a driver is located, another Lambda function calculates the best route between the user and the driver. This route information is returned to the user, while a notification about the trip-request is sent to the driver via the WebSocket connection. Finally, another Lambda function marks the driver as occupied, completing the trip allocation process.
Testing
Testing AWS Services with Postman
During development, to quickly test our newly setup services, especially our API gateway and lambda functions, we used postman to test and analyze our requests and their responses. In the early stages of developing our application we decided against using a complicated CI/CD pipeline with automated testing, to accelerate our development process and also to be able to get quick feedback of what we need to change.
Lambda Function Testing
In our project, we wrote unit tests for all our Lambda functions using Jest. Jest is a popular JavaScript testing framework that works well for testing Lambda functions. It provides a simple interface for writing tests, along with powerful capabilities for mocking dependencies and simulating different scenarios. This allows us to effectively verify that our Lambda functions perform as expected under various conditions.
When unit testing Lambda functions, it’s crucial to focus on several key aspects, with mocking being one of the most important. Lambda functions often interact with various external services, databases, or APIs. To ensure that our tests are reliable and focused, we need to isolate these external interactions. Jest’s mocking capabilities allow us to simulate these dependencies, so we can test our Lambda functions independently.
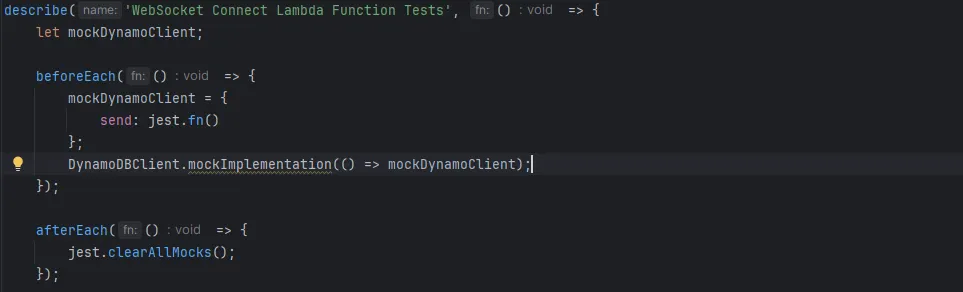
Setting Up AWS Client Mocks for Lambda Function Testing
When testing our Lambda functions that interact with AWS Clients, it’s crucial to mock these interactions to prevent real operations from being executed. This is important because running real operations during testing can lead to unintended side effects, such as modifying live data, incurring costs, or impacting production environments. In the following section, we’ll demonstrate how to set up AWS client mocks using Jest, focusing on a mock for the DynamoDB client.
First, we use jest.mock to replace the actual DynamoDBClient with a mock version. This mock has a send method, which is also a mock function, allowing us to control and verify interactions with it during tests. We also mock the PutItemCommand to ensure our tests do not invoke real AWS services.

Within the describe block, we define the test suite for the Lambda function. In the beforeEach hook, we create a new mock instance of DynamoDBClient with a send method. We then configure Jest to use this mock client whenever DynamoDBClient is instantiated in the tests. After each test, we call jest.clearAllMocks to reset the mock state, ensuring tests do not affect each other.
Unit Testing Lambda Functions
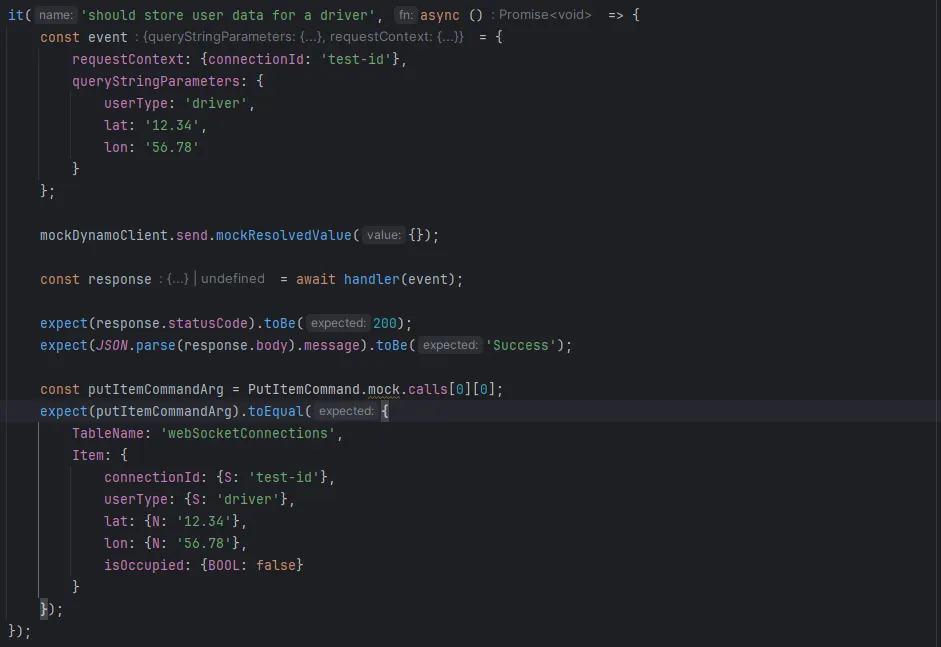
After setting up the mock for the DynamoDB client, we proceed to demonstrate how we have written a unit test for one of our Lambda functions. This test validates that the lambda function correctly stores user data in DynamoDB.
testing Lambda functions using mocks
- Setup the Test Event: We simulate an incoming event with a connection ID and user data for a driver
- Mock DynamoDB Client: We configure the mock DynamoDB client to return a successful response
- Invoke the Lambda Handler: We call the Lambda function with the test event and wait for the response
- Verify the Response: We check that the Lambda function returns a status code of 200 and a success message
- Verify DynamoDB Command Arguments: To ensure that the Lambda function sends the correct data to DynamoDB, we check the arguments used in the
PutItemCommandmock. This step confirms that the data is formatted and passed correctly
React Component Testing
In our project, we also used Jest to test our React components, focusing our attention on those with significant logic. Jest is also very helpful for React component testing with its snapshot testing for tracking UI changes, powerful mocking features, and seamless integration with tools like React Testing Library for realistic user interaction tests.
In the following, you’ll find an example unit test code along with a brief explanation. The unit test verifies that the SearchBar component displays location suggestions correctly as the user types.

sample code of a react unit test
First, two location entries (Berlin, Germany and Bern, Switzerland) are created as mock data, and the useQuery hook is mocked to return this data. The SearchBar component is then rendered, and user input of “Ber” is simulated. The test checks that the suggestion list appears correctly and that each location from the mock data is displayed in the list.
CI/CD pipeline with Gitlab, Turborepo and Pulumi
In early development, we decided against a CI/CD pipeline and instead tested most of our functionality directly via Postman. However, after the core functionality was done and we got ready to define our infrastructure in code to deploy it automatically, a pipeline became unavoidable.
Pipeline Overview
Our pipeline consists of three stages:
- Test
- Build
- Deploy
Testing and Building
We use Turbo, a powerful build system for monorepos, to both test and build our application. Here’s a snippet from our test stage:

test stage of our CI/CD pipeline
npm ci stands for “clean install” and is the recommended way to install packages in an automated environment.
By simply running turbo test, the tests in every package of the repository get executed. This not only makes it easy to run all the tests, but turbo also executes those tasks in parallel, leading to great speed improvements! At the same time, including tests in the pipeline is a great way to spot problematic commits early.
Deployment and how to handle AWS Credentials
To deploy the application inside of our pipeline, we run a deploy script which uses pulumi. Our AWS credentials are set as masked variables inside the repository. AWS credentials are typically stored in the .aws/credentials file, which allows setting up multiple AWS profiles. These profiles can be used inside of pulumi’s configuration files, and for this project, we used the profile [ubert] to store the AWS credentials of our shared account.
By simply setting the credentials as variables inside of the repo however, the profile does not get created and pulumi can’t find the [ubert] profile. That is why we execute a simple shell script before running pulumi: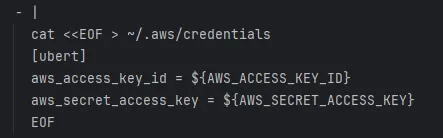
dumping AWS credentials
This creates the AWS credentials file and stores the access key in the correct profile.
Pulumi
Pulumi is an open-source Infrastructure as Code tool that allows us to define and manage cloud resources using familiar programming languages like TypeScript, Python, or Go. Its purpose is to simplify the process of creating, deploying, and managing cloud infrastructure by treating infrastructure as software. Pulumi’s main advantages include using standard programming languages (which enables better code organization, reuse, and testing), supporting multiple cloud providers, and providing a consistent workflow across different environments.
Our approach
All of the infrastructure code was written after testing the setup by manually setting it up on AWS. However, there are still some problems with the current script, which we weren’t able to fix on time.
Despite that, let’s take a look at the implementation. Our pulumi project was set up inside the infra/ package. All infrastructure that pulumi shall create is defined inside the index.ts file. Here is a brief overview of what our file contains:
-
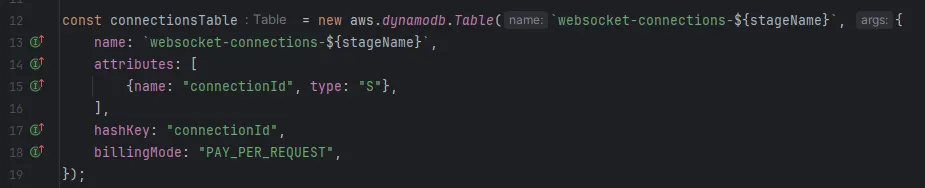
DynamoDB table for WebSocket connections
-
IAM roles and policies for Lambda functions
These policies are attached to a role which will be assumed by the lambda functions. This is necessary to provide the Lambdas with permission to invoke other Lambda functions or write to DynamoDB.
-
Lambda functions for various backend operations (e.g., calculating closest driver, calculating routes, handling WebSocket events)
It’s easy to import the code from an archive and define the handler function, which acts as entry point when the Lambda is invoked.

-
API Gateway for REST API endpoints
Defining a Rest API is very straightforward. Routes can easily be created via the routes parameter, which just takes an array of objects as can be seen in the example. The provided eventHandler is simply one of the created Lambda functions.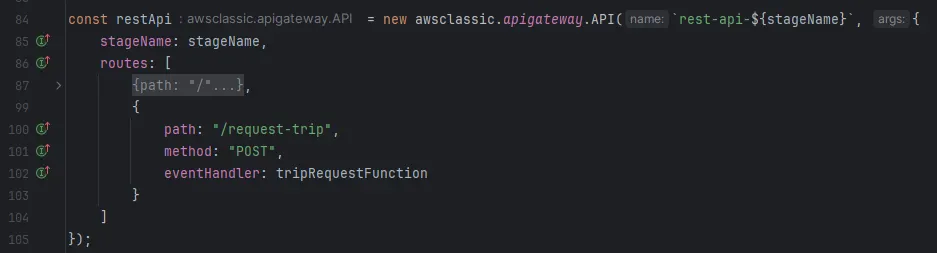
-
WebSocket API for real-time communication
Setting a websocket API is a little more complicated, as it takes several steps. First, create the API. Afterwards, create integrations which reference the API and the Lambda via their outputs (id and invokeArn)
Then we can finally define the route.
-
S3 bucket for hosting the frontend application
AWS Amplify is how we hosted the frontend during development - we just linked it to a github repository that contained the frontend code. However, Amplify seems to only be able to deploy from a github repository, there’s no way to just upload files directly. For that reason, we had to manually set up an S3 bucket and a CloudFront distribution. Just using a bucket is enough for us, since a React frontend without a framework like NextJS is just a static website that can be served by any file server.Creating the bucket was no problem. But actually being able to write content to it was a huge pain. Having no experience with AWS, it took hours to figure out which permissions need to be set, how to set bucket ownership, the bucket policy and how to enable public access to the bucket.
-
CloudFront distribution for content delivery
The S3 bucket which will contain our React frontend will be delivered via CloudFront, which generates https certificates and caches the bucket contents for us. -
Cognito User Pool for authentication and user management
Authenticating with Cognito takes several steps. We need a user pool, where all the users will be stored inside of. Optionally, the users can be assigned to groups for role-based auth. In our case, that would be the “Admin” and “Driver” groups. Lastly, an app client is needed. This client defines Oauth flows, allowed callback URLs and token validity. -
Environment configuration for the frontend application
Here comes the tricky part. Did you pay attention? We created the bucket, but didn’t upload any files to it. That is because the frontend needs variables like the signin URL, API URLs and more. However, those variables are all only known at the end of the deployment. At the same time, our Cloudfront needs access to our S3 bucket! We solved this chicken-egg problem by first creating the bucket, then all other necessary resources, then writing the environment variables to a env.json file inside of the frontend build. After all of that, we can finally upload that folder to our bucket!
Would we use it again?
Our experience with Pulumi was challenging. The documentation often felt difficult to navigate, we frequently found ourselves struggling to achieve desired outcomes and unexpected results happened often. But of course it’s worth noting that this was our first time using the tool, and there’s a possibility that it becomes easier with more experience.
Despite these difficulties, we’re not ruling out Pulumi for future projects. Nevertheless, we are interested in exploring alternatives: maybe SST, or just use raw terraform at some point.
What seems good about just writing Terraform is its seemingly larger community and wealth of online resources. When facing issues, it appears easier to find solutions and examples for Terraform online, which could potentially save us time and frustration.
Ultimately, while Pulumi has its strengths, our first experience with it was mixed. So, let’s see what the future holds!
Difficulties
In any tech project, especially one involving cloud computing for the first time, you can expect a few bumps along the way. Our journey was no exception. In the following sections, we’ll detail some of the specific difficulties we faced and how we worked through them.
Dealing with WebSocket API Gateway Challenges
A difficulty that had us struggling for an entire afternoon was setting up a web socket API gateway. The problem here was that first we had to understand what routes are, what default routes are and how they both work. We also had to understand that the API gateway enriches the data that the user sends with a whole bunch of metadata like connection parameters and so on. After we understood this, we tried to push the connection ID of a connected user to our DynamoDB table so that we could later reference all connected entities when sending out a broadcast request. At first, we had problems importing the tools from the aws-sdk which we needed to access our database from our lambda function. After we figured out the correct import statement we were confronted with another error that indicated that our lambda function lacked permission to access the DynamoDB table. After quick research we found out how to grant permissions to AWS Services and this was the key to success. Now we were able to push the connection IDs of connected users to the database and after we implemented the lambda function for the $disconnect route we were also able to remove them after the entity disconnected.
Why are we not getting a response?
Another difficulty was the response handling of lambda functions. After the problem described in the paragraph above, we were able to call lambda functions and write stuff to our DB. The problem now was, that the response we sent from our lambda function did not make it to our frontend. After researching we figured out that by default the two way connection is disabled in our web socket API. This fixed the first error and we got a response, however every message contained a strange error, suggesting that the response content type was wrong. The solution to this was that we had forgotten to define an integration response which tells AWS in what format the response will be.
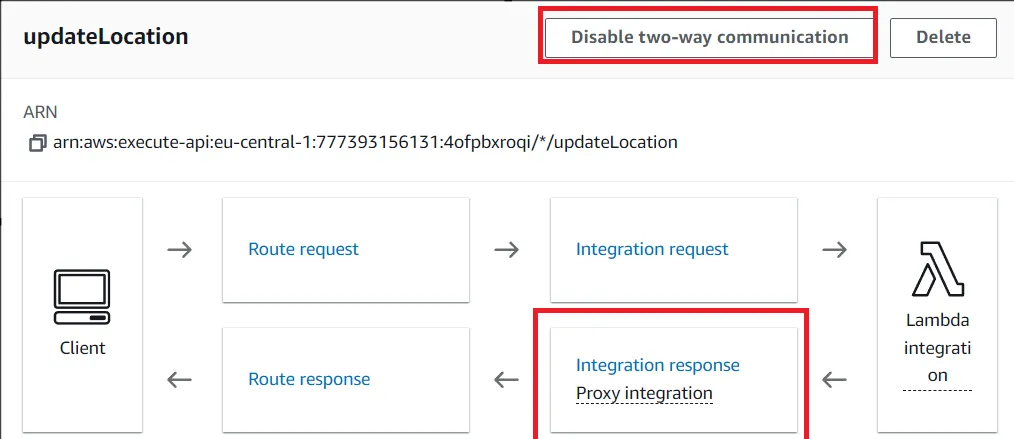
After setting up a proxy integration, we finally got the response we were looking for.
Choose and assign correct permissions for services
Multiple times during our development process we faced the issue that our services didn’t work at first set up. After double checking every parameter or line of code the solution often was very simple. We had forgotten to assign the right permissions to the service.
In our experience, this issue arose frequently due to our usage of the AWS web interface. When using Infrastructure as Code (IaC), the likelihood of missing assigning permissions is significantly reduced. This is because IaC provides a comprehensive overview and comparison of all configured services, and its setup tools often include error handling and reminders to address any missing configurations.
What channel should this data be delivered through?
The fact that our frontend reacts to multiple data parameters it receives from the backend makes it really difficult to decide through what channel the information should be transferred. Should the information be delivered through the response of the API request or rather via the websocket connection. We decided that users receive data through both channels while the driver receives all its data through the websocket connection.
This approach worked for us but became really messy as we started to add more features. As the websocket protocol has only one channel you can send data through you have to look at each message and need to decide how the frontend should react to it. A solution for this could have been using a protocol like MQTT which offers the possibility to post and subscribe to different channels which makes the data read out much more clean.
Wrapping up: Lessons learned and what could be next?
Lessons learned
The biggest lesson we learned is how to approach the design of a cloud-centric application. The aspects that have to be considered while planning the architecture, the possibilities that AWS provides but also the disadvantages of each choice you make. With backend using cloud services the importance of investing time in planning is even bigger than with a standard frontend-backend application.
Another much appreciated lesson is about logging. We can’t put into words how helpful CloudWatch was during development. On many occasions we could not find the reason why an aspect was not working and had to dig through logging. But, thanks to the detailed logging AWS provides, we were always able to find and fix the error.
One of the most significant lessons learned is the importance of managing permissions carefully. It’s tempting to grant broad permissions, such as attaching full-access policies, especially when trying to get things up and running quickly. However, this approach can lead to serious security vulnerabilities. To ensure optimal security, it’s crucial to invest the time to identify and assign the minimal permissions required for each role, user, or service.
And last but not least we had the most fun developing and discussing important decisions when being together. What might have felt dull when done alone transformed into a productive, day-long session when working alongside others.
What could be next?
While our Uber clone lays a strong foundation, there’s a wealth of possibilities for future development. Although time constraints may limit our ability to create a fully-fledged ride-sharing platform immediately, there are numerous enhancements we could explore to refine and expand the app.
One significant improvement would be transitioning from simulated drivers to real data. This shift would involve updating the Driver Panel to handle live driver availability and interactions.
Additionally, we have already developed an Admin Panel in the frontend, designed to display crucial information such as the number of drivers currently online, their routes, and detailed user data. However, this panel currently only shows sample data because it is not yet connected to the backend. Integrating it with the backend would be the next logical step, but due to time constraints, we have prioritized other functionalities for now.
Another area for potential growth is integrating real-time traffic data. Currently, our system calculates the shortest route for each driver without factoring in current traffic conditions. By incorporating live traffic information, we could determine not only the driver with the shortest route to the pickup location but also the driver who can reach the customer the fastest, considering factors such as congestion and road closures. This would ensure that the most efficient driver, in terms of actual travel time, is selected.
Adding features like estimated arrival times could also enhance the user experience. By providing accurate predictions for how long it will take for a driver to reach the customer, as well as the total travel time to the destination, we could improve transparency and set clearer expectations. Additionally, implementing accurate cost calculations for rides would provide users with transparent fare estimates before they book a ride.
Even though we may not have the time to develop every feature now, these potential enhancements represent exciting opportunities to evolve our Uber clone into a more sophisticated ride-sharing platform in the future.